Firewall
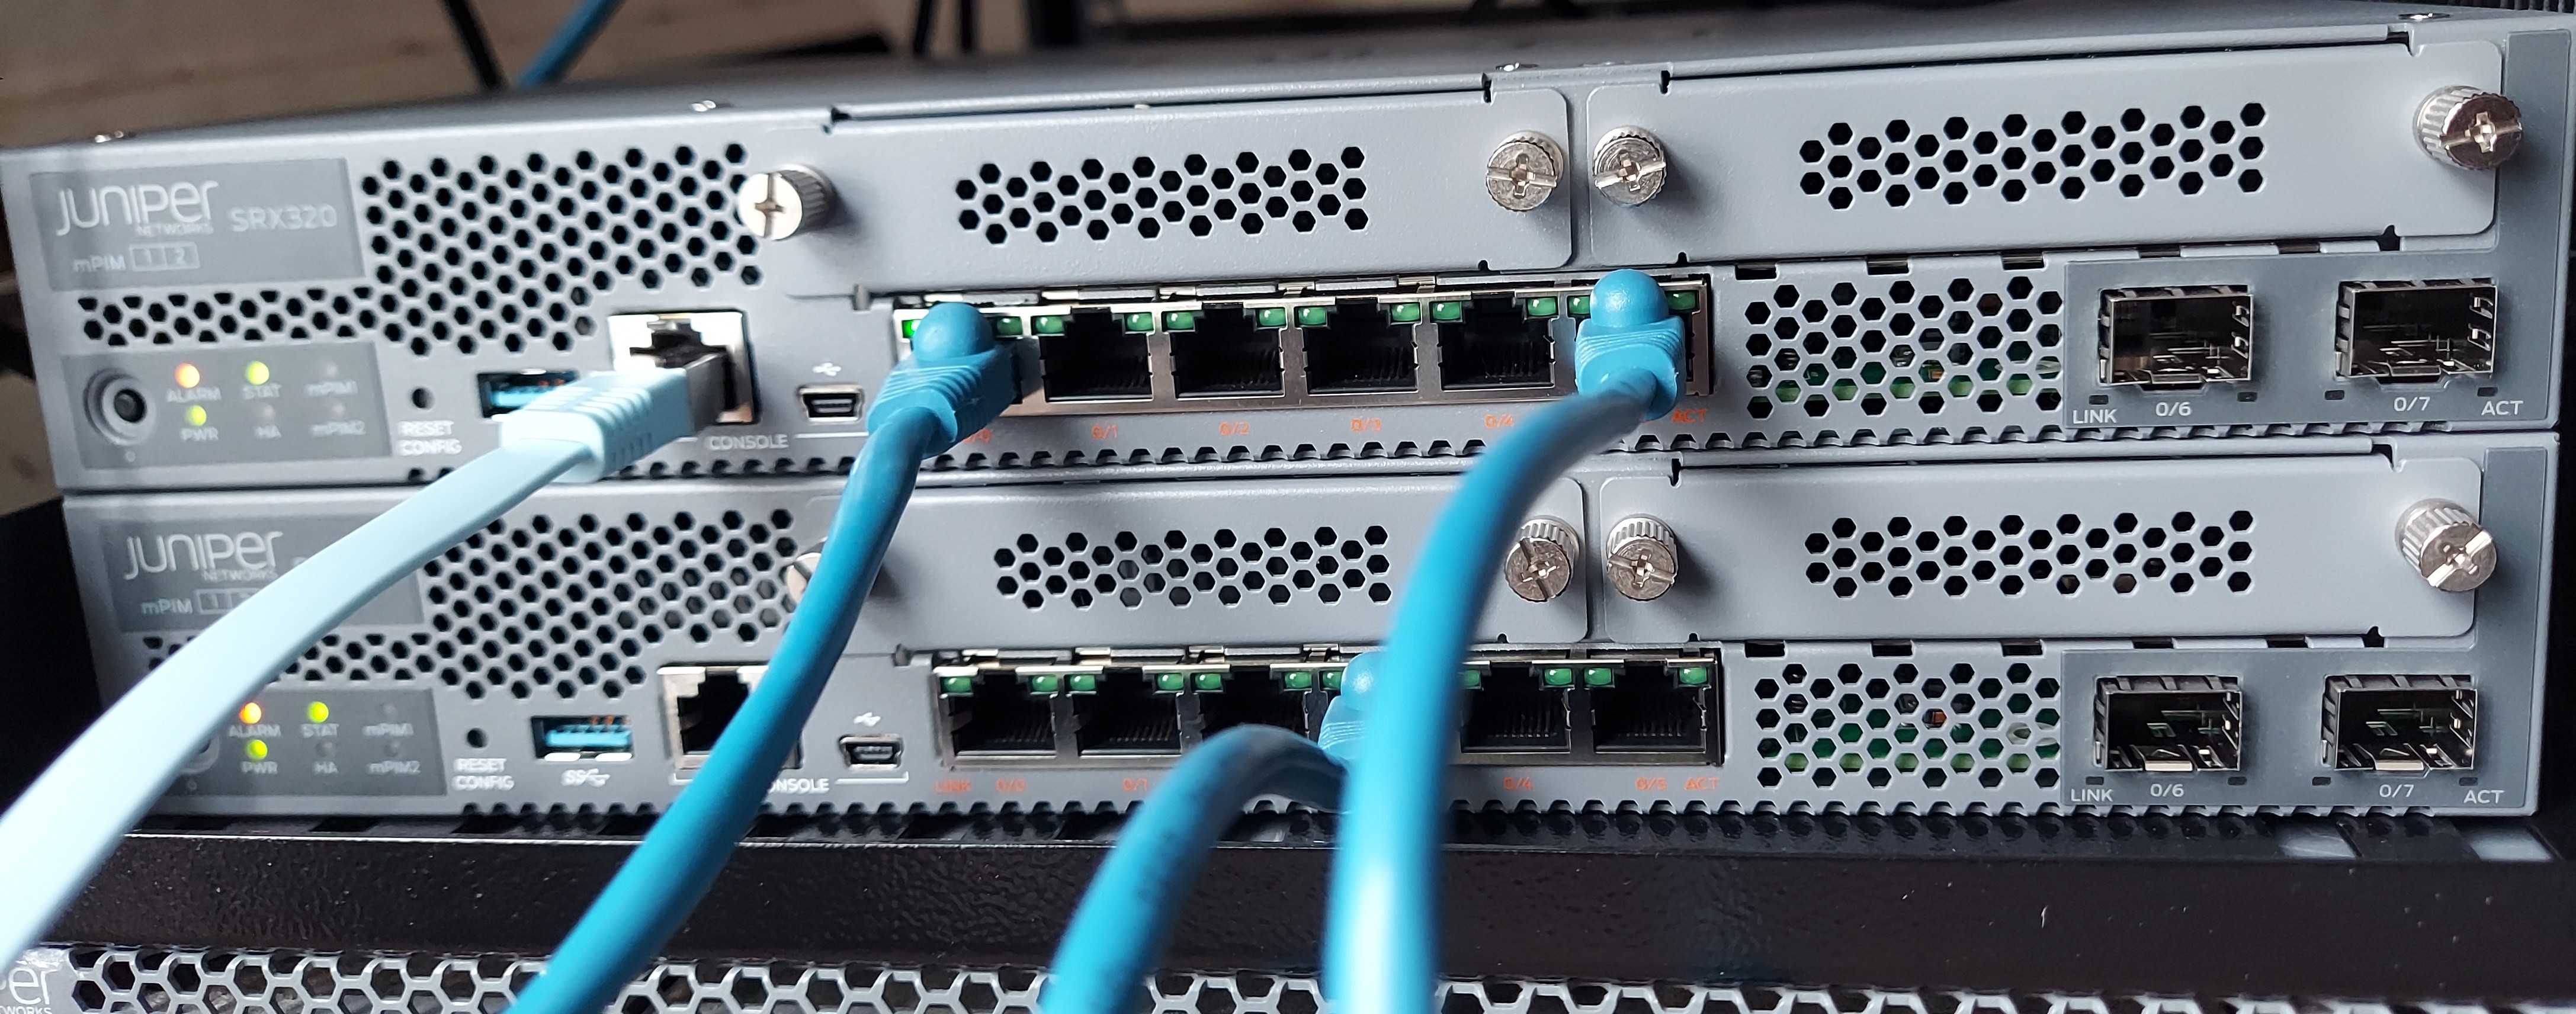
Juniper SRX: Virtual Private Networks - VPNs
VPNs are a secure mechanism to establish a connection between two sites. In this post we are going to focus on IPsec. IPsec is a set of standards and protocols used to used to authenticate and encrypt packets.
IPsec
IPsec provides four functions:
- Authentication
- Integrity
- Confidentiality
- Replay protection
IPsec encryption algorithms
-
Data Encryption Standard -
DES -
Triple Data Encryption Standard -
3DES -
Advanced Encryption Standard -
AES
IPsec authentication algorithms
-
MD5
-
SHA-1
-
SHA-2
IPsec VPN key exchange
-
Manual key exchange
-
Internet Key Exchange
IPsec VPN Modes
-
Tunnel Mode
-
Transport Mode
Junos device always operate in tunnel mode for IPsec tunnel.
The transport mode has a lower overhead compared to tunnel mode but it can cause IP addressing information to be exposed.
IPsec configuration
SRX supports two types of VPN configuration:
-
Policy-based VPN: here only the traffic the matches the configured policy will be encrypted. This is commonly used for simple site to site VPNs and remote access VPNs.
-
Route-based VPN: all traffic routed into the virtual tunnel interface will be sent over the VPN tunnel. The virtual interface is know as
secure tunnel interface - (st0)
Policy-based VPN Configuration
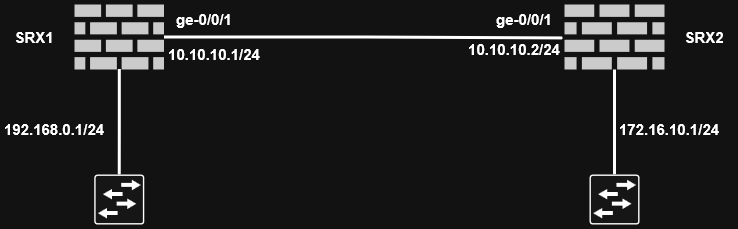
The configuration needs to be done on both perimeter devices. We should configure the zone where IPsec traffic terminates to accept IKE traffic with
edit security zones security-zone ZONE-A

set host-inbound-traffic system-services ike
-
Configure IKE proposal
-
Authentication method
-
Authentication algorithm
-
Encryption algorithm
-
Diffie-Hellman group
-
Lifetime
-
edit security ike

set proposal IKE-PROPOSAL-1 authentication-method pre-shared-keys

set proposal IKE-PROPOSAL-1 authentication-algorithm sha1

set proposal IKE-PROPOSAL-1 encryption-algorithm aes-128-cbc

set proposal IKE-PROPOSAL-1 dh-group group2

set proposal IKE-PROPOSAL-1 lifetime-seconds 86400
Make sure the device at the other end is also configured the same.
-
Configure IKE policy
- Mode (main or aggressive)
- Pre-shared key
- IKE proposal to use
edit security ike

set policy IKE-POLICY-1 mode main

set policy IKE-POLICY-1 proposals IKE-PROPOSAL-1

set policy IKE-POLICY-1 pre-shared-key ascii-text "sECrET KeY 1"
The pre-shared-key must match on both endpoints.
-
Configure IKE gateway
- IKE policy to use
- Remote gateway address
- External interface
edit security ike

set gateway SRX-2 ike-policy IKE-POLICY-1

set gateway SRX-2 address 10.10.10.2

set gateway SRX-2 external-interface ge-0/0/1.0
This marks the end of phase 1 configuration.
-
Configure IPsec proposal
- Security protocol (ESP or AH)
- Authentication algorithm
- Encryption algorithm (only if ESP is used)
edit security ipsec

set proposal IPSEC-PROPOSAL-1 protocol esp

set proposal IPSEC-PROPOSAL-1 encryption-algorithm aes-128-cbc

set proposal IPSEC-PROPOSAL-1 authentication-algorithm hmac-sha1-96
This marks the end of phase 2 configuration.
-
Configure IPsec policy
- Perfect forward secrecy (Diffie-Hellman group)
- IPsec proposal to use
edit security ipsec

set policy IPSEC-POLICY-1 perfect-forward-secrecy keys group2

set policy IPSEC-POLICY-1 proposals IPSEC-PROPOSAL-1
-
Configure IPsec VPN
- Gateway
- IPsec policy to use
edit security ipsec

set vpn SRX1-SRX2 ike gateway SRX-2

set vpn SRX1-SRX2 ike ipsec-policy IPSEC-POLICY-1

set vpn SRX1-SRX2 establish-tunnels immediately
This marks the end of phase 1 and phase 2 configuration.
-
Configure security policies
- One policy per direction of flow
edit security policies

set from-zone ZONE-A to-zone ZONE-B policy ZONEA-ZONEB-VPN

set match source-address any

set match destination-address any

set match application any

set then permit tunnel ipsec-vpn SRX1-SRX2
For the other direction of the traffic:
edit security policies

set from-zone ZONE-A to-zone ZONE-B policy ZONEB-ZONEA-VPN

set match source-address any

set match destination-address any

set match application any

set then permit tunnel ipsec-vpn SRX1-SRX2
We then use pair-policy to link policies that reference the same VPN tunnel. In our case ZONEA-ZONEB-VPN and ZONEB-ZONEA-VPN.
set then permit tunnel pair-policy ZONEA-ZONEB-VPN
In the previous policy we also add:
set then permit tunnel pair-policy ZONEB-ZONEA-VPN
Then finally set the maximum segment size (MSS) value for the VPN:
set security flow tcp-mss ipsec-vpn mss 1350
Then verify and commit the configuration.
Repeat the configuration for the other device.
Route-based VPN Configuration
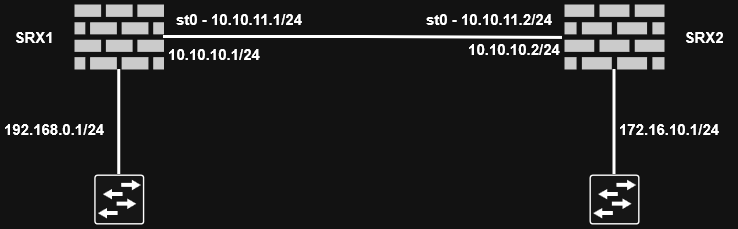
The VPN type determines what traffic will be encrypted. Regardless of the type of configuration, IPsec functionality remains the same.
- Configure secure tunnel interface
edit interfaces st0

set unit 0 family inet address 10.10.11.1/24
- Configure security zone
Define a zone for secure tunnel interface.
edit security zones security-zone VPN-ZONE-1

set interfaces st0.0
- Configure route
Route VPN traffic via st0
set routing-options static route 172.16.10.1/24 next-hop st0.0
-
Configure IKE proposal
- Authentication method
- Authentication algorithm
- Encryption algorithm
- Diffie-Hellman group
- Lifetime
edit security ike

set proposal IKE-PROPOSAL-1 authentication-method pre-shared-keys

set proposal IKE-PROPOSAL-1 authentication-algorithm sha1

set proposal IKE-PROPOSAL-1 encryption-algorithm aes-128-cbc

set proposal IKE-PROPOSAL-1 dh-group group2

set proposal IKE-PROPOSAL-1 lifetime-seconds 86400
-
Configure IKE policy
- Mode (main or aggressive)
- Pre-shared key
- IKE proposal to use
edit security ike

set policy IKE-POLICY-1 mode main

set policy IKE-POLICY-1 proposals IKE-PROPOSAL-1

set policy IKE-POLICY-1 pre-shared-key ascii-text "sECrET KeY 1"
-
Configure IKE gateway
- IKE policy to use
- Remote gateway address
- External interface
edit security ike

set gateway SRX-2 ike-policy IKE-POLICY-1

set gateway SRX-2 address 10.10.10.2

set gateway SRX-2 external-interface ge-0/0/1.0

set gateway SRX-2 version v2-only
This marks the end of phase 1 configuration
-
Configure IPsec proposal
- Security protocol (ESP or AH)
- Authentication algorithm
- Encryption algorithm (only if ESP is used)
edit security ipsec

set proposal IPSEC-PROPOSAL-1 protocol esp

set proposal IPSEC-PROPOSAL-1 encryption-algorithm aes-128-cbc

set proposal IPSEC-PROPOSAL-1 authentication-algorithm hmac-sha1-96
-
Configure IPsec policy
- Perfect forward screcy (DH group)
- IPsec proposal to be used
edit security ipsec

set policy IPSEC-POLICY-1 perfect-forward-secrecy keys group2

set policy IPSEC-POLICY-1 proposals IPSEC-PROPOSAL-1
-
Configure IPsec VPN
- Gateway
- IPsec policy to use
- Bind with
st0interface
edit security ipsec

set vpn SRX1-SRX2 ike gateway SRX-2

set vpn SRX1-SRX2 ike ipsec-policy IPSEC-POLICY-1

set vpn SRX1-SRX2 establish-tunnels immediately

set vpn SRX1-SRX2 bind-interface st0.0
-
Configure security policies
- One policy per direction of flow
edit security policies

set from-zone ZONE-A to-zone VPN-ZONE-1 policy ZONEA-VPNZONE1

set match source-address any

set match destination-address any

set match application any

set then permit
For the return traffic:
edit security policies

set from-zone VPN-ZONE-1 to-zone ZONE-A policy VPNZONE1-ZONEA-VPN

set match source-address any

set match destination-address any

set match application any

set then permit
Set the maximum segment size (MSS) value for the VPN:
set security flow tcp-mss ipsec-vpn mss 1350
Verify and commit the configuration.
Repeat the configuration for the other device.
Learn more about IPsec VPN in SRX devices
Juniper SRX: Network Address Translation
Network Address Translation (NAT) is a method for modifying or translating network address information in packet headers. Either or both source and destination addresses in a packet may be translated. NAT can include the translation of port numbers as well as IP addresses.
Junos NAT Types
-
Source NAT: Many to one translation of source IP addresses -
Destination NAT: One to many translation of destination IP addresses -
Static NAT: One to one translation of one IP address
Source NAT
The source NAT is a very common NAT configuration. It is commonly used to translate multiple private addresses to one public address. It only allows outgoing connections.
Common uses include:
-
Translate one IP address to another IP address
-
Translate one contiguous block of addresses to another block of addersses of the same size or less.
-
Translate one contiguous block of addresses to one IP address
-
Translate one contiguous block of addresses to the address of the egress interface
There are two types of Source NAT Translations:
-
Interface-based: the source address is translated to the address configured on the egress interface. This is also calledinterface NAT. The interface-based translation uses theport address translationand does not require the configuration of anaddress pool. -
Pool-based: it uses a set of IP addresses for translation.
We configure source NAT using rules. A rule requires:
-
a
traffic direction: here we need to specifyfrom interface,from zone, orfrom routing-instanceandto interface,to zone, orto routing-instance -
the
packet information: here we need the source and destination IP addresses or subnets, source port numbers or port ranges, destination port numbers or port ranges, and protocols or applications.
If multiple source NAT rules overlap, the more specific will take precedence.
Three actions can be configured in a source NAT rule:
-
interface: the source address will be translated to the address configured on the egress interface -
pool: the source addresses will be translated to a pool of addresses -
off: the source NAT will not be applied
Source NAT configuration
NAT processing centers on the evaluation of NAT rule sets and rules. A rule set determines the overall direction of the traffic to be processed. A rule set can contain multiple rules. Once a rule set is found that matches specific traffic, each rule in the rule set is evaluated for a match. Each rule in the rule set further specifies the traffic to be matched and the action to be taken when traffic matches the rule.
Interface-based NAT configuration
edit security nat

# create rule-set
edit source rule-set ZONE-A-TO-ZONE-B

# add traffic direction
set from zone ZONE-A
set to zone ZONE-B

# create rule
edit rule R1

# add rule match criteria
set match source-address 0.0.0.0/0
set match destination-address 0.0.0.0/0

# add action
set then source-nat interface
See allocated port with:
show security nat interface-nat-ports
Pool-based NAT configuration
To create a source pool,
edit security nat

edit source pool SOURCE-POOL-1

set address 172.16.1.1/32 to 172.16.1.50/32
Change the rule set rule action to use the pool.
edit security nat source

set rule-set ZONE-A-TO-ZONE-B rule R1 then source-nat pool SOURCE-POOL-1
Proxy ARP
A proxy ARP configuration is required with pool-based source NAT. Here is how to conigure a proxy ARP on the SRX device.
edit security nat

edit proxy-arp interface ge-0/0/1
set address 172.16.1.1/32 to 172.16.1.50/32
With source NAT, port address translation (PAT) is enabled by default. If PAT is disabled, the number of translations is limited by the number of IP addresses available in the pool. To disable PAT, run:
edit security nat source pool SOURCE-POOL-1
set port no-translation
To see NAT usage, run:
show security nat resource-usage source-pool SOURCE-POOL-1
The overflow pool is a pool to to be used if the original pool is exhausted. It could be a user defined source NAT pool or an egress interface.
To configure an overflow pool:
edit security nat source pool SOURCE-POOL-1

set overflow-pool interface
Destination NAT
Destination NAT is used to translate the destination address of a packet. It commonly translate the public IP address of a packet to a private internal IP address. Destination NAT only allows incoming connections.
Common uses include:
-
Translate a destination IP address to another address
-
Translate a destination IP address and PORT to another address and port
-
Translate a contiguous block of address to another contiguous block of addresses
Destination NAT supports only pool-based NAT.
Destination NAT Rules:
-
Traffic direction:
from interface,from zone, orfrom routing-instance -
Packet information: source and destination IP addresses or subnets, source port or port ranges, destination port or port ranges, and protocols or applications
There are only two actions we can configure for destination NAT:
-
Pool
-
Off
If we have overlapping rules in the destination rule set, the most specific rule will take precedence.
Destination NAT configuration
To create a destination pool:
edit security nat

edit destination pool DESTINATION-POOL-1

set address 192.168.1.1/32
edit security nat destination

edit rule-set RS1

set from zone ZONE-A

edit rule R1

set match destination-address 12.1.1.5/32

set then destination-nat pool DESTINATION-POOL-1
We also need to add proxy ARP because the destination address does not belong to any interface.
We can then define a security policy that is configured to look for the translated address since the security policy lookup happens after the translation.
Static NAT
Static NAT is a combinations of source NAT and destination NAT. Static NAT translation is always one to one. For each private IP address, a public IP address must be allocated and we don't need to configure an address pool.
To configure a static NAT, we need:
-
the traffic direction. Only the
fromportion is required. -
the packet information. the protocols or applications are not needed here
A proxy ARP is also required here.
Since static NAT allows the communication in both directions, we need to configure two security policies.
Learn more about NAT in SRX devices here
Juniper SRX: Firewall Security Policies
Security policies are used to enforce rules on transit traffic. Transit traffic is traffic that is not destined to the SRX device. Host inbound traffic is not controlled using security policies.
Security policies affect the traffic from one zone and exiting another zone. The combinations of a from-zone and a to-zone is called context. Every context has an ordered list o policies and the list is processed top to bottom.
Security policies are stateful in nature. That means that return traffic is allowed by default. The SRX device will drop all traffic that is not explicitly permitted by a security policy.
Packet Processing in an SRX device
Initial Policy Lookup
- Source zone (based on ingress interface)
- Destination zone (based on route lookup)
- Source IP address
- Destination IP address (after static and destination NAT translation)
- Source port
- Destination port (after destination NAT translation)
- Logical system
- User identity
- Protocol
Session Lookup
- Source IP address
- Destination IP address
- Source port
- Destination port
- Protocol
The SRX device uses these 5 elements to determine whether a packet belongs to an existing session or not.
Security Policy Configuration
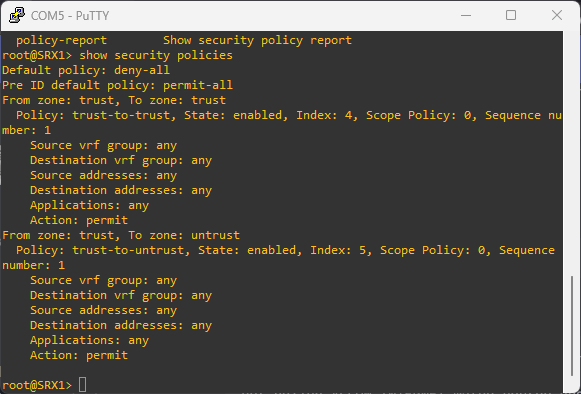
To see configured security policies, run:
show security policies
To create an ew security policy , run:
edit security policies from-zone TRUST to-zone ZONE-A

set policy ALLOW-INTERNET match source-address any
set policy ALLOW-INTERNET match destination-address any
set policy ALLOW-INTERNET match application any

set policy ALLOW-INTERNET then permit
Since policies are evaluated from top to bottom, if there is a need to move a policy, we can do that with:
edit security policies from-zone ZONE-A to-zone UNTRUST

insert policy ALLOW-INTERNET before policy DENY-ALL
Source and destination addresses are two of the five match criteria that should be configured in a security policy. You can now configure wildcard addresses for the source and destination address match criteria in a security policy. A wildcard address is represented as A.B.C.D/wildcard-mask. For example 10.10.10.10/255.255.0.255.
The wildcard address usage is not restricted to full octets only. You can configure any wildcard address. For example, the wildcard address 172.16.0.1/255.255.18.255. But The first octet of the wildcard mask should be greater than 128. For example, a wildcard mask represented as 0.255.0.255 or 1.255.0.255 is invalid.
Configuring wildcard security policies on a device affects performance and memory usage based on the number of wildcard policies configured per from-zone and to-zone context. Therefore, you can only configure a maximum of 480 wildcard policies for a specific from-zone and to-zone context.
Security Policy Actions
-
permit: the packet is permitted based on the initial packet policy lookup -
reject: for TCP packet, and TCP reset is sent. UDP, ICMP, and any other IP protocol, an ICMP reset is sent. -
deny: the packet is silently dropped -
count: counts bytes or kilobytes of all traffic the policy allows to pass through the devices in both directions. -
log: logs traffic information for the policy
Policy Precedence
Multiple security policies may have similar match criteria. Policy precedence rules will determine which policy will be applied first. Here is the matching order:
-
Intrazone policies: The ingress and egress interfaces are in the same zone. For example
from-zone ZONE-A to-zone ZONE-A -
Interzone policies: The ingress and egress interfaces are in different zones. For example
from-zone ZONE-A to-zone ZONE-B. -
Global policies: They are evaluated if the packet does not match intrazone or interzone context. Global security policies are ordered and also evaluated from top to bottom.
-
Default action: The default policy denies all traffic by default. It can be configured with
set security policies default-policy deny-all. This policy is evaluated if the packet does not much the context of intrazone, interzone, global policies.
Schedulers
A scheduler is a configuration that allows a security policy to be activated during certain time. For example if we want to allow certain vendors on weekends.
A scheduler can be associated with multiple security policies but a policy can be associated with only one scheduler. When a scheduler is inactive, a policy is unavailable for lookup.
Scheduler configuration
edit schedulers scheduler VENDER-WEEKEND-SCHEDULE

set saturday all-day
set sunday all-day
To see the status of schedulers, run:
show schedulers
To attach a scheduler to a policy,
edit security policies from-zone ZONE-A to-zone ZONE-B policy VENDER-POLICY

set scheduler-name VENDER-WEEKEND-SCHEDULE
Application firewall
Traditional security policies permit or reject traffic based on layer 3 or layer 4 information. We use IP addresses and port number to determine what traffic is allow to go through the SRX device. For example, we can control applications such as HTTP, SMTP, and DNS because these applications used well-known standards ports only. This approach is limited especially when dealing with evasive applications.
Juniper Networks application firewall (AppFW) provides policy-based enforcement and control on traffic based on application signatures. By using AppFW, you can block any application traffic not sanctioned by the enterprise. AppFW enables us to enforce the policy control on Layer 7 traffic.
For AppFW to work, we need to have the Application identification license installed on the SRX device. We also need to download and install the application signatures package, a predefined signature database of applications.
AppFW support
-
Traditional AppFW is supported in Junos OS 18.2 and lower
-
AppFW with Unified Policies is supported from Junos OS 18.2
Unified Security Policies
Unified security policies allow the use of dynamic applications as match criteria along with layer 3 and layer 4 information. So traffic is classified using layer 4 to layer 7 information and policy actions are applied based on identified application.
Unified policies leverage the application identity information from the application identification (AppID) service to permit, deny, reject, or redirect the traffic. A unified policy configuration handles all application firewall functionality and simplifies the task of configuring a firewall policy.
Unified security policies are easier to configure and is more granular.
To block Facebook:
set security policies from-zone ZONE-A to-zone ZONE-B policy BLOCK-FACEBOOK match dynamic-application junos:FACEBOOK-ACCESS
Application identification license installation
Use show system license in operational mode to see if the required license is installed on the SRX device. Make sure appid-sig is installed and available.
Download and install the application signature package
Download the application signatures with:
request services application-identification download. Check the status of the download withrequest services application-identification download status.
Install the package with:
request services application-identification install. Check the status of the installation withrequest services application-identification install status.
To learn more about any predefined application, run the operational command show services application-identification application detail junos:FACEBOOK-ACCESS.
Intrusion Detection and Prevention - IDP
To enable the IDP, we need to have the appropriate license installed, and we need to have the signature database downloaded and installed. Then we can configure IDP policy and enable security policy for IDP inspection.
A IDP policy configuration looks like:
set security policies from-zone ZONE-A to-zone ZONE-B policy ALL-WEB then permit application-services idp-policy IDP-POLICY-1
IDP is part of the security policy configuration. It is enabled per policy bases.
When an attack have been identified, Junos execute an IDP action. Here are IDP actions:
no-actionignore-connectiondifserv-markingclass-of-servicedrop-packetdrop-connectionclose-clientclose-serverclose-client-and-serverrecommended
IDP policy configuration
Install IPD license
See installed license with show system license. IDP license is indicated by idp-sig in the SRX device.
Download and install signature database
Run request security idp security-package download to download the security package. Append status to see the download status. check-server shows more details about the package to be downloaded.
Configure IDP policy
We can download the IDP policy template with request security idp security-package download policy-templates. Install the package with request security idp security-package install policy-templates.
Then add the download templates.xsl into the configuration database. For that we run set system scripts commit file templates.xsl
To learn more about an attack object, run:
show security idp attack attack-list predefined-group [GROUP-NAME]
To learn more about an IDP policy, run:
show security idp attack attack-list policy [POLICY-NAME]
To create a custom IDP policy, run:
set security idp idp-policy POLICY-1
then configure the policy to fit our need.
Configure security policy for IDP inspection
To configure an IDP inspect in a security policy, run:
set security policies from-zone ZONE-A to-zone ZONE-B policy ALL-WEB then permit application-services idp-policy POLICY-1
show security idp status
will show us IDP status.
Integrated User Firewall
The integrated user firewall is a mechanism to use user information as match criteria for security policies. This feature retrieves the user-to-ip address mapping information from Windows Active Directory.
Note that tracking for non Windows Active Directory is not supported and multiple users logged to the same device is also not supported. In addition the LDAP authentication performed is simple authentication. So the username and password are sent in clear text.
Learn more about firewall security policies
Juniper SRX: Firewall Security Zones
Security zones are important elements in Juniper SRX firewall devices.
What is a firewall security zone?
A security zone in Juniper SRX device is a logical unit used to divide a network into segments that may have different security requirements. Interfaces are then associated with security zones. Each interface can be associated to only one security zone, and each security zone can have multiple interfaces with the same security requirements for inbound and outbound traffic.
Juniper SRX Series Firewall secures a network by inspecting, and then allowing or denying, all connection attempts that require passage from one security zone to another.
Security zones have the Trust zone which is available only in the factory configuration and is used for initial connection to the device. After you commit a configuration, the trust zone can be overridden
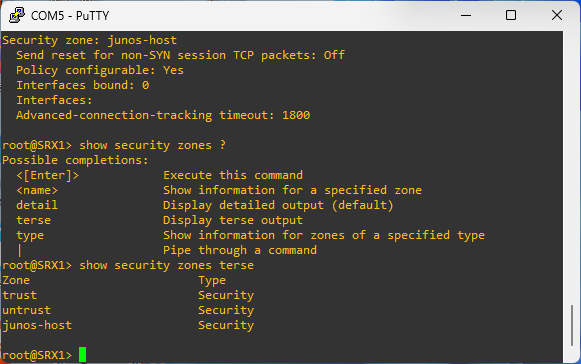
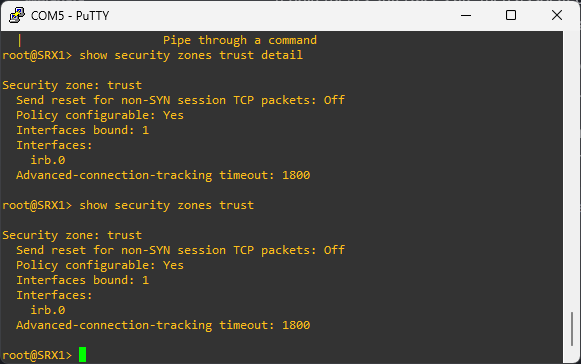
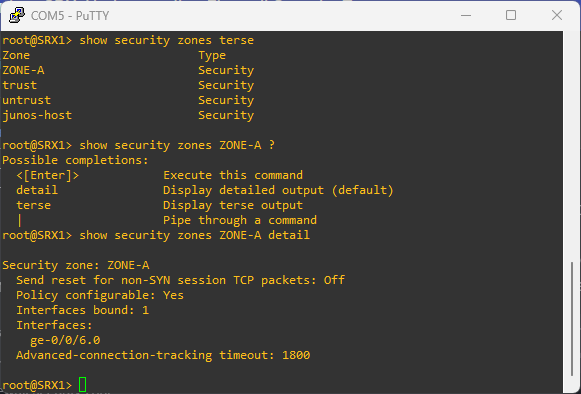
# to see the zones configured on the device
show security zones
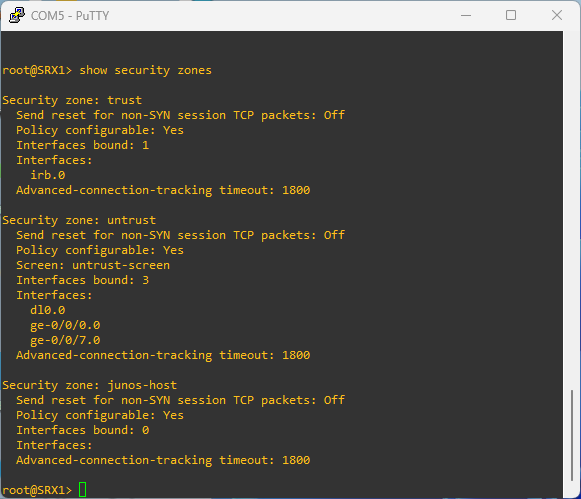
Security zone components
Security policies
Security policies are rules that regulates traffic going from one zone to another. They are processed in the order they are defined.
Policies allow us to deny, permit, reject, encrypt and decrypt, authenticate, prioritize, schedule, filter, and monitor the traffic attempting to cross from one security zone to another. We decide which users and what data can enter and exit, and when and where they can go.
Screens
Screens are predefined configurations that are used to block common network level attacks. Screens configurations are applied to ingress packets only. They are check at the beginning of the packet flow so that packets can be dropped as early as possible.
Screens categories
Statistics based screens
This is ued to determine normal network behavior and form a baseline level. Any activity outside the baseline is flagged as abnormal
Signature based screens
Use patterns or signagures to identify malicious behaviors.
Screen configuration
# create screen
edit security screen ids-option ZONE-A-SCREEN

# 50 icmp packet per second for a destination
set icmp flood threshold 50

# attach screen to zone
set security zones security-zone ZONE-A screen ZONE-A-SCREEN
To see the stats of the screen:
show security screen statistics zone ZONE-A
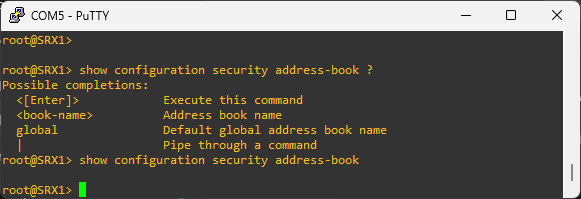
Address books
Address books are made of IP addresses and address sets used to make it easier to apply policies to them. By default, the SRX device configuration has an address book called global. The global address book is not attached to any security zone. But any additional address book created bust be attached to a security zone.
Address object defined in one zone cannot be used in another zone. But address objects defined in the global address book can be used in any zone.
# create a new address book
edit security address-book BOOK-A

set address DNS-SERVER 172.16.20.10/32
set address STAGING-SERVERS 192.168.10.0/26
Address objects
IP prefix
- LAN1 192.168.50.1/24
- DNS Server 192.168.40.1/32
edit security address-book ZONE-A

set address DNS-SERVER 9.9.9.9/32
IP range
- Servers 172.16.1.1-172.16.1.50
edit security address-book ZONE-A

set address SERVERs range-address 192.168.40.20 to 192.168.40.80

set attach zone ZONE-A
DNS address
- Syslog server log.mywebsite.com
edit security address-book ZONE-A

set address WEBAPP dns-name myapp.mysite.com

set attach zone ZONE-A
Wildcard address
- 172.16.20.50/255.255.0.255 - matches 172.16.*.50
edit security address-book ZONE-A

set address LAB-SERVERS wildcard-address 10.10.10.10/255.255.0.255

set attach zone ZONE-A
Interfaces
That is the list of interfaces in the zone. An interface can belong to only one security zone. By default, interfaces are in the null zone. The interfaces will not pass traffic until they have been assigned to a zone.
TCP RST
This feature is used to instruct the device to drop any packet that does not belong to an existing session and does not have the SYNchronize flag set.
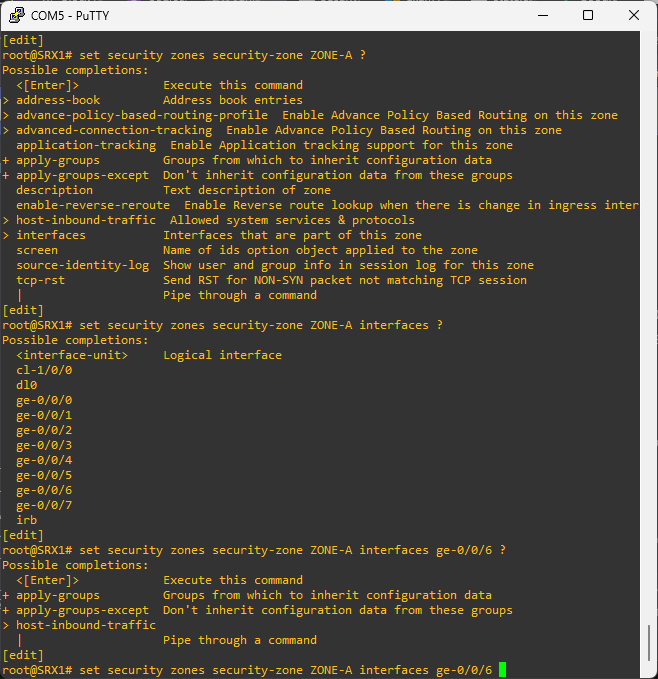
How to create security zones in Juniper SRX device?
# create a new security zone and attach an interface
set security zones security-zone ZONE-A interfaces ge-0/0/1.0
Make sure the port is a routed port
# remove ethernet switching
delete interfaces ge-0/0/6 unit 0 family ethernet-switching
What is a functional zone in Juniper SRX?
A functional zone is used to host the management interfaces. The MGT zone is the only zone currently supported functional zone. Interfaces in the MGT zone allows an out-of-band management.
# create a functional zone and attach and interface
set security zones functional-zone management interfaces ge-0/0/2.0
Host inbound traffic
Host inbound traffic is the traffic that is terminating at the SRX device. It is the traffic destined to the SRX device itself. That is different from transit traffic which enters from one interface and exits from another interface.
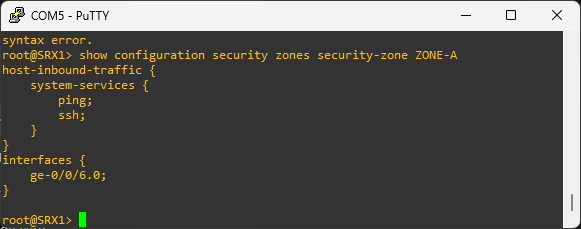
# to view host inbound traffic configuration
show security zones security-zones ZONE-A
# enable ssh, ping, and http web management in host inbound traffic
set security zones security-zones ZONE-A host-inbound-traffic system-services ssh
set security zones security-zones ZONE-A host-inbound-traffic system-services ping
set security zones security-zones ZONE-A host-inbound-traffic system-services http
The host inbound traffic can be configured in the zone level or in the interface attached to the zone. When the host inbound traffic is configured at the interface level, that configuration takes precedence over the configuration at the zone level.
# enable ssh, ping, and http web management in host inbound traffic via the interfaces
set security zones security-zones ZONE-A interfaces ge-0/0/1.0 host-inbound-traffic system-services ssh
set security zones security-zones ZONE-A interfaces ge-0/0/1.0 host-inbound-traffic system-services ping
set security zones security-zones ZONE-A interfaces ge-0/0/1.0 host-inbound-traffic system-services http
There a two host inbound traffic that we can configure:
-
system-services
-
protocols
Juniper application objects
The Junos default configuration group is hidden.
# to see the default configuration group
show configuration groups junos-defaults

# to see the default applications
show configuration groups junos-defaults applications
We can also create custom applications
# go to applications configuration
edit applications

# add a custom application
set application CUSTOM-APP application-protocol http
set application CUSTOM-APP application-port 8080

# add another custom application
set application CUSTOM-APP-2 application-protocol http
set application CUSTOM-APP-2 application-port 8443

# add an application set and previous applications
set application-set WEB-APPS application CUSTOM-APP
set application-set WEB-APPS application CUSTOM-APP-2
To specify multiple criteria for an application, for example multiple destination ports, we use a term.
# adding terms to a custom application
set application CUSTOM-APP term 1 destination-port 8080
set application CUSTOM-APP term 2 destination-port 8081
Learn more about firewall security Zones
Juniper SRX: Firewall Filters
This post is going to be focussed on Juniper SRX firewall filters. They are important to understand and configure because they protect your firewall from malicious traffic passing through or destined to the firewall.
What is a Firewall Filter?
A firewall filter in Juniper SRX is a security feature that defines a policy that evaluates the context of connections and permits or denies traffic based on the context (source IP address, destination IP address, port numbers, TCP sequence information, and TCP connection flags), updating this information dynamically.
Firewall filters are also known as access control lists by other vendors like Cisco. Other names also include authorization profile and packet filter.
How does Juniper SRX Firewall Filter Work?
The firewall filter inspects each and every packet coming in and going out of the SRX device interfaces. It is stateless and does not keep track of the state of the connections. It can be configured to accept or discard a packet before it enters or exits a port or interface. That is how we control the type and quantity of traffic that enters the device or exits the device.
If a packet is inspected and deemed to be acceptable, a class-of-service and traffic can be applied. If a packet arrives on an interface for which no firewall filter is applied for the incoming traffic on that interface, the packet is accepted by default. By default, a packet that does not match a firewall filter is discarded.
Firewall filters can be applied to all interfaces, including the loopback interface to filter traffic entering or exiting the device.
An IPv6 filter cannot be applied to an IPv4 interface that is because the protocol family of the firewall filter and interface must match.
Firewall Filter Components
Terms
A term is a named structure in which match conditions and actions are defined. Each term has a unique name. A firewall filter contains one or more terms, and each term consists of match conditions and actions. Let's note that a firewall filter with a large number of terms can adversely affect both the configuration commit time and the performance of the Routing Engine. The order of terms is important and impact the results. A firewall filter include a default term that discards all traffic that other terms did not explicitly permit.
The implicit term looks like:
term implicit-discard-all {
  then discard;
}
Match Conditions
A match condition or packet filtering criteria defines the values or fields that the packet must contain to be considered a match. If no match condition is specified, all packets are a match. So if we want an action to be taken for all packets, we can just omit the match condition. We use the from keyword to specify the match statement. If a packet contains multiple match conditions, the packet must match all conditions to be considered as a match for the term.
If a single match condition is configured with multiple values, such as a range of values, a packet must match only one of the values to be considered a match for the firewall filter term.
The match condition that is selected for the term depends on the protocol family the we select for the firewall filter.
Example of match conditions:
- Source IP
- Destination IP
- TCP and UDP ports
- TCP flags
- IP options
- Incoming interface
- Outgoing interface
- ICMP packet type
- etc...
Actions
If all match conditions specified in the term are true, the action is taken. If the match condition of a term is omitted, the action specified is also taken.
It is a good practice to explicitly configure one or more actions per firewall filter term. Any packet that matches all the conditions of the term is automatically accepted unless the term specifies other or additional actions.
There are three (3) types of actions:
Terminating actions
-
Stops the evaluation for the filter for a specified packet
-
The specified action is performed, no additional term is evaluated
-
Terminating actions include
accept,discard, andreject.The
acceptaction causes the system to accept the packet. Thediscardaction causes the system to silently drop the packet without sending and ICMP message back to the source address. Therejectaction causes the system to discard the packet and send an ICMP message back to the source address.
Nonterminating actions
Nonterminating actions are used to perform other actions on a packet that do not halt the evaluation of the filter. Those actions include incrementing a counter (count), logging information about the packet header (log), sampling the packet data, sending information to a remote host using the system log functionality (syslog), or rate limiting traffic (policer).
If a term contains a nonterminating action without an explicit terminating action, such as accept, discard, or reject, the system will accept the matching packet by default. If we don't want the firewall filter action to terminate, we can use the next term action after the nonterminating action.
example 1: term 2 never get evaluated because term 1 action is nonterminating. So, the default accept action is taken right after log.
[edit firewall filter demo]
term 1 {
    from {
        source-address {
           192.168.10.0/24;
        }
    }
    then {
        log;
    }
}
term 2 {
    then {
        discard;
    }
}
example 2: The have term 2 evaluated, we explicitly said it in term 1 using next term
[edit firewall filter test]
term 1 {
    from {
        source-address {
            192.168.11.0/24;
        }
    }
    then {
        log;
        next term;
    }
}
term 2 {
    then {
        reject;
    }
}
Flow control actions
A flow control action enables a device to perform configured actions on the packet and then evaluate the following term in the filter, rather than terminating the filter.
A standard firewall filter can have a maximum of 1024 next term actions. A commit error will occur if we exceed this number.
Firewall filter configuration
interfaces ge-0/0/1 {
  unit 0 {
    family inet {
      filter {
        input: inbound-filter-demo;
        output: outbound-filter-demo;
      }
    }
  }
}
input is used to filter traffic entering the interface and output is used to filter traffic exiting the interface.
Example of firewall filter configurations
# to enter firewall filter configuration
edit firewall filter
Block all bad ICMP messages
# create the filter
edit firewall filter BLOCK-BAD-ICMP

# create the term with the matching condition
set term ALLOW-TRUSTED-ICMP from protocol icmp

# allow icmp from selected ips
set term ALLOW-TRUSTED-ICMP from source-address 192.168.10.10/32
set term ALLOW-TRUSTED-ICMP from source-address 172.16.24.24/32

# accept ICMP from trusted sources
set term ALLOW-TRUSTED-ICMP then accept

# block untrusted ICMP
set term BLOCK-UNTRUSTED-ICMP from protocol icmp
set term BLOCK-UNTRUSTED-ICMP then discard

# allow all other traffic
set term ALLOW-OTHER-TRAFFIC then accept
# apply filter to interface
edit interfaces ge-0/0/1 unit 0 family inet

filter input BLOCK-BAD-ICMP

commit
See the configured filter
show firewall filter BLOCK-BAD-ICMP
Block all telnet
edit firewall filter BLOCK-ALL-TELNET

set term BLOCK-TELNET from protocol tcp
set term BLOCK-TELNET from destination-port telnet
set term BLOCK-TELNET then discard

set term ALLOW-OTHER-TRAFFIC then accept
then apply it to the loopback interface then commit the configuration